Hey everybody,
I hacked something together in order to create a Kubernetes cluster on CoreOS (or Container Linux) using Vagrant and Ansible.
If you keep reading, I'm going to talk to you about Kubernetes, etcd, CoreOS, flannel, Calico, Infrastructure as Code and Ansible testing strategies. It's gonna be super fun.
The whole subject was way too long for a single article. Therefore, I’ve divided it into 5 parts. This is episode 3, regarding Infrastructure as Code, and the tools of the trade.
If you want to try it:
git clone https://github.com/sebiwi/kubernetes-coreos
cd kubernetes-coreos
make up
This will spin up 4 VMs: an etcd node, a Kubernetes Master node, and two Kubernetes Worker nodes. You can modify the size of the cluster by hacking on the Vagrantfile and the Ansible inventory.
You will need Ansible 2.2, Vagrant, Virtualbox and kubectl. You will also need molecule and docker-py, if you want to run the tests.
Alright. Whenever I think about automating the creation of a platform or an application using Infrastructure as Code, I think about three different stages: provisioning, configuration and deployment.
Provisioning is the process of creating the virtual resources in which your application or platform will run. The complexity of the resources may vary depending on your platform: from simple virtual machines if you're working locally, to something slightly more elaborate if you're working on the cloud (network resources, firewalls, and various other services).
Configuration is the part in which you configure your virtual machines so that they can behave in a certain way. This stage includes general OS configuration, security hardening, middleware installation, middleware-specific configuration, and so on.
Deployment is usually application deployment, or where you put your artefacts in the right place in order to make your applications work on the previously configured resources.
Sometimes, a single tool for all these stages will do. Sometimes, it will not. Most of the time I try to keep my code as simple and replaceable as possible (good code is easy to delete, right?). Don't get me wrong, I won't play on hard mode or try to do everything using shell scripts. I'll just try to keep it simple.
But let me talk to you a bit about CoreOS first.
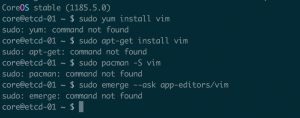
Container Linux by CoreOS (formerly known as CoreOS Linux, or just CoreOS) is a lightweight Linux distribution that uses containers to run applications. This is a game changer if you're used to standard Linux distributions, in which you install packages using a package manager. This thing doesn't even have a package manager.

Now what?!
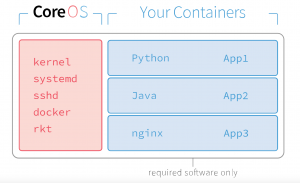
It just ships with the basic GNU Core Utilities so you can move around, and then some tools that will come in handy for our quest. These include Kubelet, Docker, etcd and flannel. I'll explain how these things work and how I'm going to use them in the whole Kubernetes journey later. Just keep in mind that CoreOS (yeah yeah, Container Linux) is an OS specifically designed to run containers, and that we're going to take advantage of that in our context.

CoreOS as a distribution [1]
So we're going to manually create these CoreOS virtual machines before installing Kubernetes, right?
Well, no, not really.
Vagrant is pretty rad too. It allows you to create reproducible environments based on virtual machines on many different backends, using code. So you just write something called a Vagrantfile, in which you specify all the machines you want and their configuration using Ruby. Then, you type `vagrant up` and all your virtual machines will start popping up.
For this we're using VirtualBox as a provider. There are many others, in case you're feeling creative.
So, once we have all the virtual hosts we need running in our computer, we're just going to manually configure everything in them, right?
Well, no, not really.
You do know Ansible, right? Just so you know, an ansible is a category of fictional device or technology capable of instantaneous or superluminal communication. The term was first used in Rocannon's World, a science fiction novel by Ursula K. Le Guin. Oh, it is also an IT automation tool.
I really like Ansible because most of the time*, the only thing you need in order to use it is a control machine (which can be the same computer you're using to code) and SSH access to the target hosts. No complex architectures or master-slave architectures. You can start coding right away!
*: This is not one of those cases, but we'll get to that in the next article.
So, we can configure our platform automatically using Ansible. We're just going to create our machines automatically, configure our resources automatically, and just hope it works, right?
Well, no, not really.
Molecule is a testing tool for Ansible code. It spins up ephemeral infrastructure, it test your roles on the newly created infrastructure, and then it destroys the infrastructure. It also checks for a whole range of other things, like syntax, code quality and impotence, so it's pretty well adapted for what we're trying to do here.

It's an actual molecule!
There are 3 main Molecule drivers: Docker, OpenStack and Vagrant. I usually use the Docker driver for testing roles, due to the fact that a container is usually lightweight, easy to spin up and destroy, and faster than a virtual machine. The thing is that it's hard to create a CoreOS container, in order to install Kubernetes to create more containers. Like, I heard you like containers so let me put a container inside your container so you can schedule containers inside containers while you schedule containers inside containers. Besides, there are no CoreOS Docker images as of this moment. Therefore, we'll be using the Vagrant driver. The target platform just happens to be Vagrant and VirtualBox. Huh.
So we're going to test our code on VirtualBox virtual machines launched by Vagrant, which is exactly the platform we're using for our project. Great.
I could, but I won’t. That’s all for today. I’ll talk to you about the really really fun part in the next article.
Stay tuned!